Tag Archives: ssh

How to change the default position of ssh/authorized_keys file

authorized keys

Sometimes you might need to change the default position of the authorized_keys file. You might have an encrypted home directory (unless you have another session already opened, you would never enter automagically since the key file would be unreachable).

You could create a folder:

/etc/ssh/authorized_keys

 And in this folder create a new folder for each user containing their authorized_keys file. You need to set the owner and group of the folder to the user as well.

Then you need to edit /etc/ssh/sshd_config with your favorite editor and find or add the line AuthorizedKeysFile:

AuthorizedKeysFile  %h/.ssh/authorized_keys /etc/ssh/authorized_keys/%u/authorized_keys
(NOTE: it should all be on one line)

This will make the ssh server first to look at the usual location /home/<user>/.ssh/ and if not found or accessible it will continue to look in the /etc/ssh/authorized_keys/<user> folder. 

After this modification you need to restart the ssh server:

sudo service ssh restart

That’s all folks!

Cheers
/jima 

Login to a Linux server using SSH without password

SSH SSH, Secure SHell is a fantastic piece of software. It can do many many things to help you secure data transfer. Though when entering to the very same servers over and over and over it can be a bit of a hazard having to type in that very same password just as many times. Now you will learn how to skip that part making it so much easier to use not only ssh but other commands like rsync and scp.

First we need to create a key on our computer from where we want to connect to the server.  Older releases of ubuntu need you to specify the command as on the green line, while on newer releases this is the default value and there is no need to specify any parameters:

: ssh-keygen

: ssh-keygen -t rsa

The key created will have a length of 2048 bits for SSH protocol version 2. This is a very secure key length. As it seams (googling the web) it will take many many years in order to be able to crack a key of this length. Though Debian recommends a length of 4096 bits. This is easily done by adding the -b option like this:

ssh-keygen -t rsa -b 4096

Adding more bits makes the key bigger, more CPU used, more battery drain etc… depending on devices used you might consider what’s best for you. Though if it’s a key that you are planning to use on a public server for many a year to come, 4096 is by far the safer choice. When executing the program you will be asked two things

  1. Where to save the key
  2. To set a password

Just press enter and choose the default path on the first step. In this way ssh will always know where to find your key,. About setting a password: Just press enter and leave it blank, if not, you’ll be asked to type a password every time you use this key.  This is great when you’re entering really secure systems. Keys are always stronger than passwords and adding a password to the key itself helps protect even more against someone stealing your private key. I myself usually don’t use an extra password since I believe my private key are sufficiently safe. Anyway, after executing the command you will have something like this on your screen:
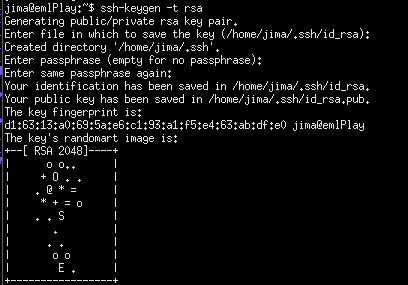
ssh-keygen-create-rsa-keys

The privet key is yours to keep safe. Never to be given to anyone. The public key however, is to be copied to the server/s you want to connect to.
The key files was saved in your home directory under a folder called “.ssh” and the private key is called “id_rsa” and the public key “id_rsa.pub”.

Here are a couple of options on how to copy your pubic key onto the server.

: ssh-copy-id <user>@<server>
You will be asked for your password on the server and that's it.

OR

: cat ~/.ssh/id_rsa.pub | ssh <user>@<server> 'mkdir -p ~/.ssh && cat >>~/.ssh/authorized_keys'
Create directory if not exist and create/append the key file.

If this doesn’t work make sure the .ssh folder has 700 permissions and that the user and group is the very one you are trying to login with. The authorized_keys file must have 600 permissions.


Cheers
/jima


Watch TV online from abroad with SSH

NOTE: These instructions are for Linux.

Watch TV from any Country

Are you traveling a lot? You might be living in another country. The problem is still the same, you would like to see those TV programs from your home country but can’t since you’re getting that annoying message that you don’t have a local IP address making it impossible to watch anything. The hard part can be to have an available computer or server where to connect. A cheap way is to buy and configure a raspberry pi and leave it with at a friends house. They consume hardly anything so it won’t affect the electricity bill. Anyway, lets get started shall we. First of all, we need to use SSH to connect to the server and set up a dynamic link (SOCKS5) to a local port on our own computer. This is done like this:

ssh -f -N -D localhost:9999 user@ssh-server.com -p 22
-f Start in the background. Using this option lets you continue controlling the terminal window. (not necessary though)
-N Don’t start a shell (we don’t need one).  You could leave this option out if you are planning to also work on the remote server through a shell
-D From the manual:  Specifies a local “dynamic” application-level port forwarding. This works by allocating a socket to listen to port on the local side, optionally bound to the specified bind_address. Whenever a connection is made to this port, the connection is forwarded over the secure channel, and the application protocol is then used to determine where to connect to from the remote machine.So in this case, we specified localhost (our own computer) and port number 9999 (you can specify the port you want)
-p The default port is already 22. It’s just added to show how you can specify which port to connect to if the ssh server your are connecting to is using a non standard port number.

For browsers like Chrome you need to change your proxy settings for the system in order for this to work. We’ll use Firefox, this will leave the rest of the system as is.

  • Open Firefox
  • Enter Preferences
  • Select Advanced
  • Click “Settings…” where it says Connection (Configure how Firefox connects to the Internet)
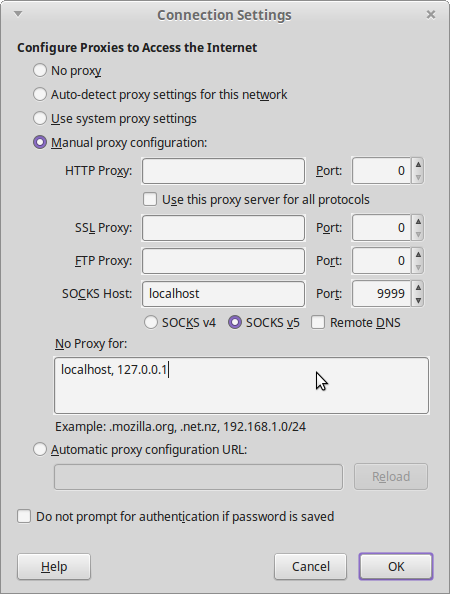
  • Change the Proxy settings as below:

Firefox Proxy Settings SSH Now entering this site you can check you current IP address. Open Chrome or Safari and enter the very same site you will notice that each browser has its own IP address. Now in Firefox you can enter the local TV sites and watch any video as if you where in the country. Enjoy… /jima